Installing a new car stereo is often challenging, especially if it’s your first time doing it. One of the most challenging steps during installation is getting the car stereo wiring harness color codes rights. A standard car stereo harness comes with numerous color codes. If you fail to get these color codes right, you risk damaging your car stereo and other components.
So what color wires go together in a car stereo? In this article, we will help you with getting these color codes right. We will also include a wiring diagram to make it easier for you. Keep on reading to find out.
Car Stereo Wires Color Code
Today, most car stereo manufacturers use the same standard for car stereo wires color code. Most manufacturers provide a wiring diagram with color codes to help you wire an aftermarket car stereo. However, some aftermarket car stereos don’t come with a wiring diagram. In that case, you can use a standard wiring diagram to match the color codes.
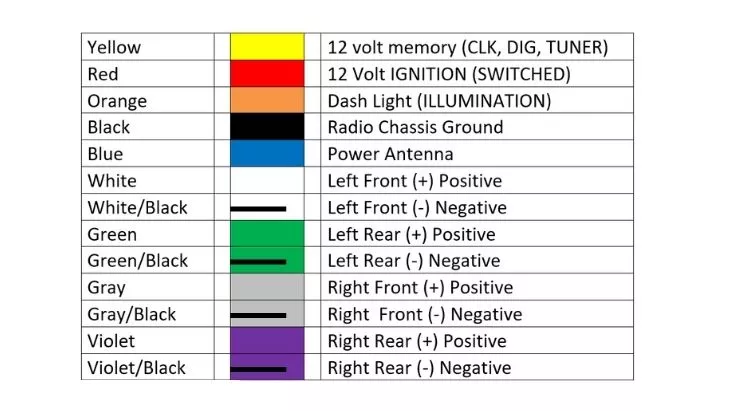
Here is a color code car stereo wiring diagram you can use:

An explanation of the car stereo wires color code when you don’t have a wiring diagram is as follows:
Black- Ground wire that you connect to an unpainted part of the chassis.
Yellow- Connect to a constant 12 voltage battery source.
Red- Connects to the accessory and turns on with the car ignition acc.
Orange- For illumination.
Orange/White- For adjustable dimmer.
Gray- Hooks to the positive terminal of the right front speaker.
Gray/black- Hooks to the negative terminal of the right front speaker.
White- Hooks to the positive terminal of the left front speaker.
White/black- Hooks to the negative terminal of the left front speaker.
Purple- Hooks to the positive terminal of the right rear speaker.
Purple/black- Hooks to the negative terminal of the right rear speaker.
Green- Hooks to the positive terminal of the left rear speaker.
Green/black- Hooks to the negative terminal of the left rear speaker.
Blue- Hooks to the antenna.
Blue/white- Hooks to the amp remote turn on.
Why You Should Use a Wiring Harness Adapter
While most aftermarket stereos use the above car stereo wire color code chart, you can find it easier to install it using a harness. A harness works as an adapter. You just need to ensure that you get the right harness adapter for your car stereo.
To use the adapter, you will hook one end of the adapter into your car stereo and hook the other end into the harness that was hooked to the factory stereo. As you can see, it makes it very easy to connect an aftermarket head unit. You don’t need to match the colored wires. It works as easily as plug-and-play.
Also, harness adapters are very affordable. You can find a harness that can match with most head unit inputs/outputs. However, the harness should match the car stereo and the car model itself. You can utilize online resources to find a harness that will match your car and head unit. However, if you can’t find a compatible harness for your head unit and car, then you will need to use the above car stereo wire color code chart.
Conclusion
After reading through this article, you now know what color wires go together in a car stereo. That way, you will find your installation experience smoother. By getting the colors right, you will get the installation right without risking your stereo or components to damage.
Frequently Asked Questions
What are the radio wiring colors?
Car stereo wiring comes in several colors. You need to match the colors as guided in the above wiring diagram.
What are red and yellow wires on a car stereo?
The red wire is the accessory wire while the yellow wire is the constant 12 volts power supply.
What color is the ignition switch wire on a car radio?
Red is the wire that is connected to the ignition switch to turn on the car stereo.
How do you wire a car stereo?
To wire a car stereo, connect the wires properly by ensuring each wire goes to the right place. The wires are colored differently to help with distinguishing which wire goes where. Use the above wiring diagram to get the connections right.
Where do you connect the black ground wire from your car stereo?
It is connected to the grounding point on the chassis. The grounding point typically has a bolt or screw to help with attaching the grounding wire.
Michael Evanchuk is a San Francisco-based sound engineer with 20 years’ experience installing, troubleshooting, and repairing commercial, automotive, and household sound equipment. Evanchuk owns an auto stereo center, where he offers highly competitive car audio installation and repair services. He has written dozens of articles on different sound engineering topics, all of which have been published in leading journals, blogs, and websites.


