
Adding an amplifier to your car stereo not only boosts the sound level but also enhances the quality of your sound. While it can take more time and effort to properly tune your amplifier, the reward you get from a well-tuned amplifier is out of this world.
One way you can achieve this is to optimize your amplifier’s mids and highs to ensure the best sound possible. However, tuning a car amplifier is a fairly complex process, and if not done correctly, it can compromise the amplifier performance, or even damage your sound system.
Understanding the frequency range
Tuning an amplifier involves several steps, and with each step, you’ll need to have some basic tuning experience. However, even before you learn how to tune your car’s audio amplifier, it is important to first understand what constitutes the mids and highs.
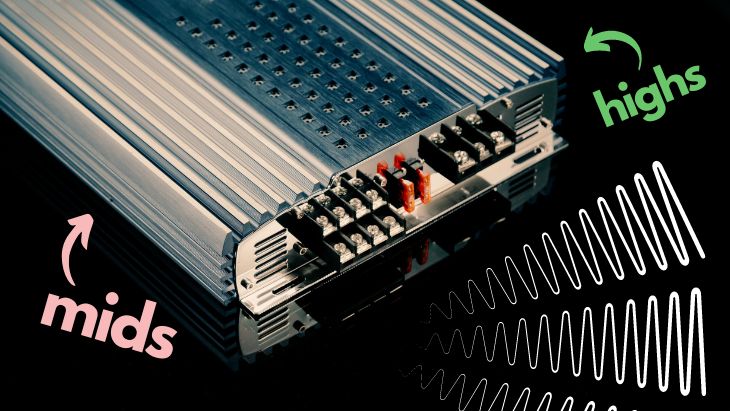
For starters, the sound we hear is basically divided into three main categories i.e., the lows, mids, and highs. The lows represent the sound frequencies that make your room vibrate, and they are reproduced by the woofers.
On the other hand, the mids represent the range where voices, including human voice and vocals are found. The highs, just as the name suggests, represent the highest sound range and usually constitute high-pitched sounds like bells, flutes, whistles, etc.
That said, tuning your amplifier’s mids and highs is one of the best things you can learn. The two frequency ranges constitute vocals and high notes and are quite critical since they make the sound feel whole and complete.
If you don’t set your mids and highs properly, you might end up with poor-quality audio. However, when adjusted correctly, your speakers, including the subwoofer will deliver the sound quality you’ve been yearning for.
How to get loud mids and highs
The best thing about adjusting the mids and highs is that you only need to use the frequency buttons of the specified range at the back of the speakers. The procedure is to a great extent manual, and you don’t require to use specialized tools to adjust your amplifier settings.
However, considering that you’ll need to rely on your ears while making the adjustments, it can be quite challenging to match up the adjustments even to the most discerning audiophiles. Luckily, you can opt to use tools such as a multimeter to simplify the process of fine-tuning your amplifier settings.
Remember, your personal tastes and preferences for the mids and highs are not always the same for everyone else. As such, the amplifier tuning will largely be customized and personalized to your preferred listening experience. That said, here are simple steps for getting loud mids and highs from your car amplifier;
Setting the gain
The first intervention measure you’ll need to undertake to achieve high-quality mids and highs is by matching amp gain to head unit. For beginners, it is important to emphasize that gain and volume control are two different things.
While the volume is used to tweak the loudness of your application, gain control is used to set the tone of the amplifier. The last thing you want is to use the wrong gain settings, and as such it is important to adjust the gain before you tweak anything else.
Here is the procedure for adjusting your gain settings;
- Before you adjust anything, ensure your volume is set to zero.
- Next, ensure that your gain is set to the minimum. You can start by turning the gain down to about the halfway mark before turning it all the way down. This will help ensure that your amplifier will not amplify the signals sent as you adjust your system.
- Try to play some music via your stereo. Now, since you’d previously set the volume at zero, you’ll not be able to hear any sound.
- At this juncture, you can adjust the stereo volume to the max level until you hear the sound distorting. Next, turn down the volume slowly until you hear the distortion disappearing.
- Remember, you might need to play around with the volume knob until you hear zero distortion from your speakers.
- Once you’ve ascertained that there is no sound distortion present, you can now shift focus to you gain control and turn it to the maximum or until the point you hear sound distortion. Next, turn the gain down back again until the distortion disappears. At this point, your gain control is perfectly set and ready to rock.
How to tune mids and highs
Once you have adjusted the gain control, you can now shift your attention to the mids and highs. For this process, you may want to experiment with different settings until you determine the sound range that will work for you.
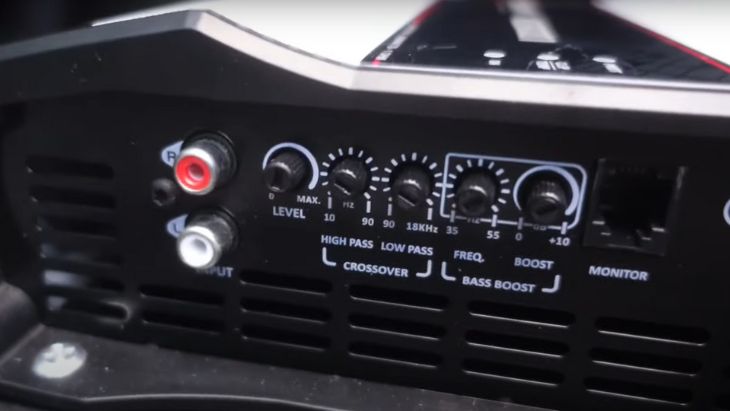
Now, in order to get loud mids and highs from your car amp, you’ll need to use both the low-pass filter and high-pass filter settings. Most amplifiers come with a high-pass filter and low-pass filter switch, which you can use to select the lowest or highest frequency range that can go through the input jacks.
To start you off, you’ll need to utilize the high-pass filter to block the low-frequency components from finding their way to the high-frequency range. In simple terms, only components above the cutoff frequency are allowed to pass through.
So if you’re looking to get loud highs from your amp, the high-pass filter is the setting to consider. The HPF helps to block frequencies that cannot be reproduced by the small door speakers while preventing bass frequencies from destroying your tweeters.
For best results, ensure to set the high-pass filter anywhere between 80 Hz – 200 Hz. This is the most ideal range for high-end sounds, plus the subwoofer should be able to handle anything below the 80 Hz mark comfortably.
On the flip side, a low-pass filter also known as LPF is the complete opposite of a high-pass filter. The latter is used to allow easy passage of low frequencies from source input to amplifier. It achieves this by blocking frequencies above the cutoff frequencies thereby making it hard for high-frequency signals to pass through.
Once you’ve tuned your car amplifier for highs, you can now focus on making the mids louder. To achieve this, you’ll need to set the LFP cutoff frequencies on the 80 Hz mark. This will ensure that all frequencies up to 80 Hz (low notes) and below are directed to the subwoofer, while allowing the midrange driver to reproduce frequency signals above this range i.e., the mids.
The best thing about using this method to fine-tune your mids and highs is that you can use the filters to customize your sound. For example, if you feel like the vocals are sounding thinner, you can adjust the HPF to allow more low notes to pass. Alternatively, you can also opt to fine-tune the LPF to block the low notes if you observe the vocals becoming boomier than expected.
Parting Shot!
In a nutshell, there is no right or wrong way to tune an amplifier, but improper tuning can generate distortion or introduce unfavorable sound effects to your music, such as buzzing, hissing, and other forms of noise. For instance, if you tune the amplifier too high, your sound is likely to become distorted or experience clipping.
On the other hand, your music might be overpowered by background noise if you tune your amplifier too low. Ideally, your goals and objectives should be to attain sound levels that are pleasing to your ears without resulting in noticeable distortion. The most important thing is to take your time while making the adjustments, and you will rarely go wrong.
Michael Evanchuk is a San Francisco-based sound engineer with 20 years’ experience installing, troubleshooting, and repairing commercial, automotive, and household sound equipment. Evanchuk owns an auto stereo center, where he offers highly competitive car audio installation and repair services. He has written dozens of articles on different sound engineering topics, all of which have been published in leading journals, blogs, and websites.


