
Car amplifiers enhance the performance of your car stereo, and this is what the Power Acoustik RZR1 2500D is all about. The best part about this amplifier is that is easy to control from your seat, thanks to the dash mount remote control.
In addition, the 2 Ohm stable amplifier delivers a maximum punch in a compact package that is easy to integrate into any factory or aftermarket car stereo. However, installing the amplifier can be an intimidating task, considering that you’ll be dealing with the car’s electrical system.
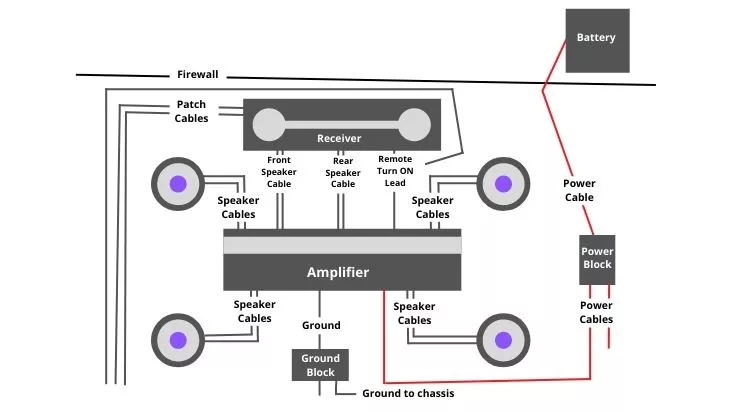
Wiring Power Acoustik RZR1 2500D
Before you get started with the installation process, you’ll want to ensure that you have all the supplies and enough wiring for the task at hand. You’ll also need to disconnect the battery to avoid electrical shocks or damaging the components. The amount of space you have in your car will determine the ideal location to install the amp, but we recommend installing the amplifier in the trunk.
Steps
i. The first thing you’ll need to do when wiring the RZR1 2500D is to establish the ground connection. Locate the dedicated grounding point on the chassis and connect the ground wire to your amplifier. You may also want to remove any rust, paint, or dirty from the surface to facilitate a good ground connection.
ii. After you’ve ensured that the ground connection is secured, you can now turn to the RCA and speaker leads. Plug the leads from the amplifier into the back of your head unit. When running the wires, ensure to use the appropriate length; always exceed the length a bit instead of leaving them too tight. Also, ensure to push the cables in as far as possible to establish a solid connection.
iii. Connect the remote antennae from the amplifier to the head unit via the remote turn-on wire. The importance of incorporating the remote turn-on wire is to prevent the amp from staying on throughout, hence draining the car battery.
iv. Next, connect the front and rear speakers (or any other speaker you want to be connected to the amplifier) to the corresponding ports on the amplifier. At this point, you can also connect the subwoofer cable from the amplifier to the subwoofer.
v. Next, connect the power cable from the battery to the amplifier positive (B+) terminal through the vehicle’s firewall. Ensure the cable runs on the opposite side of the RCA cables to prevent interferences and sound distortion.
vi. At this point, you can now install the inline fuse to provide protection against over-current/short-circuit. Depending on the size of the fuse holder, you can install the fuse at different points along the engine bay, but it needs to be close to the battery as possible.
If you need to replace the fuse in the future, ensure to get the exact make of the one that came with the unit. Using a different size fuse or one that is not recommended might damage the amplifier or the entire system altogether.
vii. Secure all wires using the appropriate fasteners and reconnect the battery. You can then test your system to ensure that all connection is secure and that all speakers are working without distortion.
Parting Shot!
As a general installation tip, you may want to examine the design of your vehicle before drilling or running any wires. Also, ensure to keep the amplifier away in an area with excessive heat or moisture. As such, ensure there’s proper ventilation to facilitate smooth running and maximum cooling. Finally, never attempt to use the amplifier before mounting it securely or in places with excessive vibrations.
Michael Evanchuk is a San Francisco-based sound engineer with 20 years’ experience installing, troubleshooting, and repairing commercial, automotive, and household sound equipment. Evanchuk owns an auto stereo center, where he offers highly competitive car audio installation and repair services. He has written dozens of articles on different sound engineering topics, all of which have been published in leading journals, blogs, and websites.


