Input sensitivity is a specification used to determine how sensitive an amplifier is to the input signal. In simple terms, input sensitivity is a measure of the amount of signal needed at the input of an amplifier in order for it to deliver a certain output level.
For instance, an amplifier that is equipped with a high sensitivity setting will generally require a low input signal level to produce a given output level. On the other hand, an amplifier with a relatively low input sensitivity will utilize a higher input signal level to deliver the same output level.
Input sensitivity is an important consideration when choosing an amplifier as it determines how much amplification or signal processing is needed to produce full power. As a general rule of thumb, a higher input sensitivity will require less amplification, while a lower sensitivity may need more signal processing to reproduce the desired output level.
How to Set Input Sensitivity
When setting the input sensitivity on your car amplifier, it is critical to match the sensitivity with the output level of your head unit or any other source device. If the input sensitivity of your amplifier is too high for the output level, the resulting signal may be too weak to produce the desired output. On the other hand, if the input level of the amplifier is too high for the output level, the output signal might become distorted or clipped.
The process of setting input sensitivity on a car amplifier may vary slightly depending on the specific needs of your application and the model of your amplifier. As such, you may want to consult the amplifier’s user manual to help you set input sensitivity correctly. That said, here are general steps you can follow to set input sensitivity on your car amplifier:
Step 1
Turn off the amplifier and disconnect the power supply. Ensure that all the speakers are disconnected before moving to the next step. At this point, you may also want to ensure that all the necessary connections from the head unit are made, including the power, ground, and signal connections.
Step 2
Locate the input sensitivity control button on your amplifier. It may also be represented by a knob or a switch usually labeled input sensitivity, input level, or something similar to that. The location of the button may vary depending on the make of your specific amplifier.
Step 3
To set the amplifier input sensitivity level, you can start by setting the control all the way down. If you are using a sensitivity range switch, then you’ll need to set it to the ‘low’ setting.
Step 4
Set your head unit to 3/4 (75%) of the full volume. The idea behind this is to facilitate reasonable sensitivity overlap with acceptable clipping at full volume. In addition, setting volume at 75% of the full volume level offers the required gain overlap for different music genres as well as varying signal strength among different sources.
Step 5
Check the user manual to determine the recommended voltage for your amplifier. Next, connect an AC voltmeter to the amplifier speaker’s output to measure the voltage output. Ensure to use the correct terminals (+ or -) when measuring the voltage level.
Step 6
Adjust the input sensitivity level until the intended voltage (the level determined in step 5) is achieved. If you’re using more than one subwoofer, then you’ll need to set an input sensitivity for each subwoofer and match them with the same exact voltage.
Step 7
Increase the sensitivity control slowly until you reach the desired level, or until the amplifier starts to clip. Next, reduce the settings until you are comfortable or until you reach a level that will not damage your components, including the speakers and the subwoofer.
Step 8
Turn the volume of the head unit all the way down and switch it off. Reconnect the amplifier power supply and turn it on. Reconnect your speakers and turn your head unit back on.
Step 9
Play a piece of familiar music on your car stereo and adjust the balance level between the amplifier and the subwoofer until the sound is clear and free from distortion. You can easily achieve this by listening to the music at a moderate volume level and adjusting the input sensitivity control as needed. Use your ears to judge and take your time to adjust the sensitivity to your liking, and you’ll hardly go wrong.
Setting Input Sensitivity Using an Oscilloscope

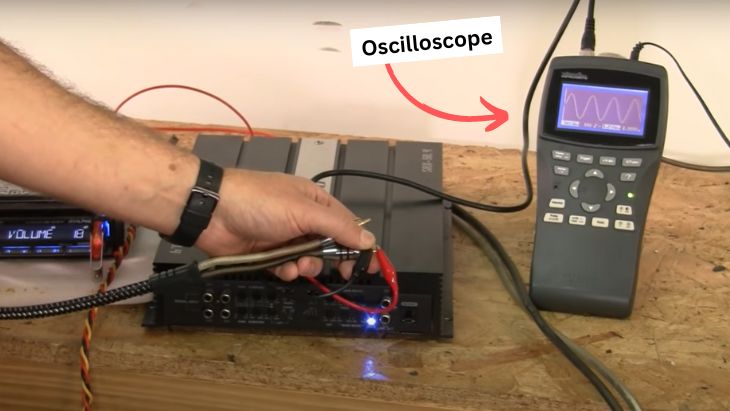
If you don’t want to go through the hassle of following all the steps above, you can easily set the input sensitivity on your amp using an Oscilloscope. This audio device is designed to detect the clipping point or the maximum level the amplifier can reach before the sound becomes distorted.
The device uses a sine wave to determine the input sensitivity required to produce the desired output level. This can be achieved by playing a song with a familiar sine wave and adjusting the input sensitivity on the wave until the wave reaches its largest scope (peak) without clipping or resulting in noticeable distortion. If clipping or distortion is present, it is often represented by flat spots at the apex (peak) of the sine wave.
Conclusion
Setting the input sensitivity correctly is critical in achieving the best sound quality possible from your car amplifier. If the input sensitivity is set too low, the amplifier will not be able to amplify the signal from your head unit properly, resulting in weak and distorted sound.
On the other hand, if the input sensitivity is set too high, the amplifier may overdrive the signal and cause clipping or other forms of distortion. As such, it is important to find the optimal balance for your music system.On the other hand, if the input sensitivity is set too high, the amplifier may overdrive the signal and cause clipping or other forms of distortion. As such, it is important to find the optimal balance for your music system.
Following the methods above, you should be in a position to easily adjust the input sensitivity of your amplifier in just a few minutes. Should you have any concerns or doubts about how to set the input sensitivity on your car amplifier, it is best to consult an expert.
Michael Evanchuk is a San Francisco-based sound engineer with 20 years’ experience installing, troubleshooting, and repairing commercial, automotive, and household sound equipment. Evanchuk owns an auto stereo center, where he offers highly competitive car audio installation and repair services. He has written dozens of articles on different sound engineering topics, all of which have been published in leading journals, blogs, and websites.


