
Adding an amplifier is one of the best things for improving your car music system. Whether you prefer listening to music softly or loudly, an amp adds extra power that allows for improved sound output. With an amp, your music system brings out finer details that you would otherwise miss without an amp.
There are several kinds of amps you can add to your music system. One of the best options is a 4-channel amp. A 4-channel amp is specially designed to power rear and front door speakers. In this article, we will take you through a 4 channel amp wiring diagram to help you in hooking the amp to your car speakers.
Why Choose a 4-Channel Amp?
Before we discuss a 4-channel amplifier wiring diagram, it will help to discuss why you should invest in this amp. Essentially, 4-channel amplifiers come in four different sizes. These sizes vary in their power output per channel.
-The most basic size is a 40 to 50 watts amp per channel. It offers sufficient power for less powerful speakers. Also, it is very compact. You can easily fit it in tight spaces such as behind the front dash. That way, you can conceal it better than larger amps. Also, you can easily hook it to the factory wiring.
-The second size is a 50 watts amp per channel. It offers reliable performance for most average music systems. Also, it delivers decent volume for most car audio systems.
-If you prefer louder sound output, you can go for a 75 watts per channel amp. The amp is large and suitable for larger vehicles.
-If you prefer competition-level performance for your music system with extremely loud volume and earth-shaking sound output, then consider a larger amp. In this case, a 100 watts per channel amp is your best bet. It is suitable for driving very powerful speakers.
You can use a 4-channel car amp to power 2 speakers using the front channel and a subwoofer by bridging the rear channels. Thus, 4-channel amps offer the benefit of extra channels in one compact amp. Thus, you do not have to install separate amps for rear and front speakers.
With a 2-channel amp, you can either wire two speakers or bridge the channels to wire one subwoofer. With a 4-channel amp, you have the added advantage of wiring four speakers or bridging two channels to wire a subwoofer and connect 2 speakers to the remaining 2 channels.
Wiring a 4-channel amp
When wiring your 4-channel amp, the first thing you should do is to get an audio signal to the amp. You will need to get a signal from the receiver. There are three ways you can do this including:
- Connect your receiver to the amplifier directly with RCA cables.
- Use a line-level adapter to connect to the radio, then connect the adapter to the amp with RCA cables.
- Connect the speaker outputs of the receiver to the speaker level inputs of the amp.
Option 1- Using RCA Cables
RCA cables allow for a clean connection with lower noise than using line-level adapters. If your amplifier and receiver come with RCA jacks, you will find it easy to hook them together. RCA jacks are white and red. The red jacks represent the right channel speakers whereas the white jacks represent the left channel speakers.
With a 4 channel amp, you will need two RCA cables. You will use one of the cables to connect the right and left front speakers and the second cable to connect the right and left rear speakers.
Option 2- Using a line-level adapter
Line level connectors/adapters are designed to connect the RCA inputs of an amp to the speaker outputs of a receiver through the adapter. However, ensure you invest in a premium quality adapter to avoid noise in the signal.
Option 3- Using speaker-level inputs
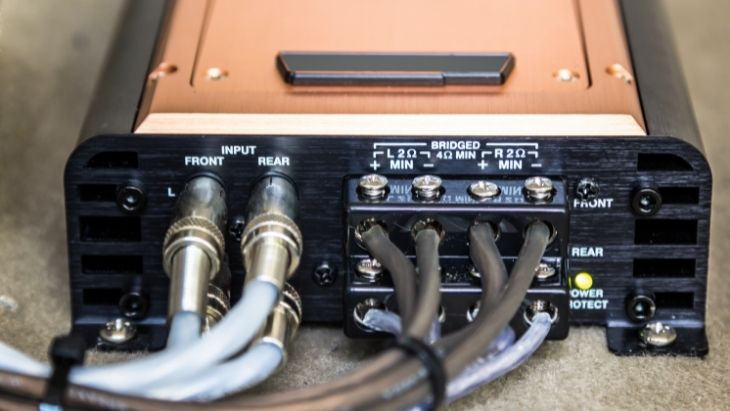
Many brands of 4 channel amps come with speaker-level inputs. If your amp has these inputs, you do not have to buy a line-level adapter. It is easy to connect an amp to the stereo using speaker-level inputs. Just ensure you connect the positive terminal of the stereo to the positive terminal of the amp using the speaker wire. Do the same for the negative terminal.
4 Channel Amp Wiring Diagram
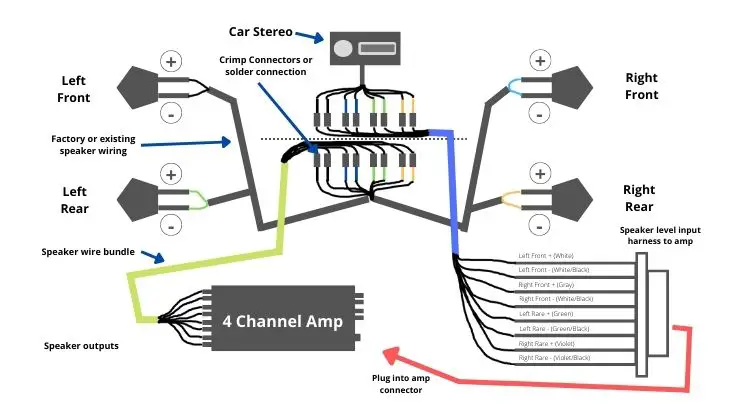
When connecting a 4 channel amp to four speakers using speaker-level connections, use the wiring diagram below to help you out:
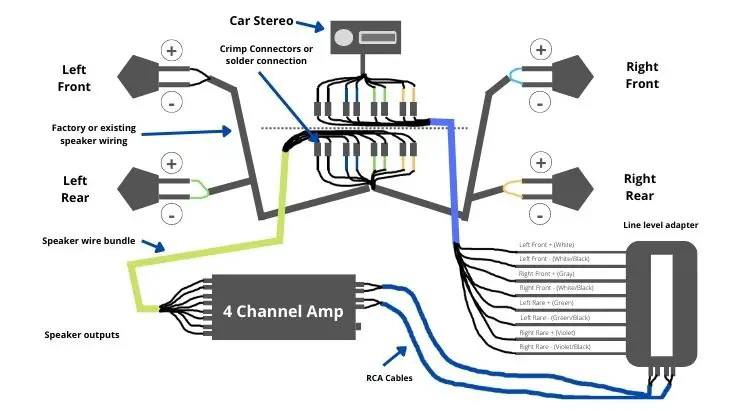
When connecting a 4 channel amp to four speakers using a line-level adapter, use the wiring diagram below to help you out:
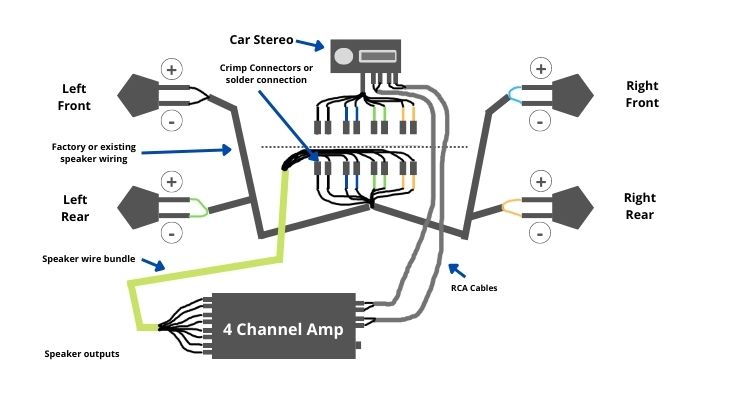
When connecting a 4 channel amp to four speakers using RCA cables, use the wiring diagram below to help you out:
If you want to connect 4 speakers and 1 subwoofer to a 4-channel amp, use the wiring diagram below to help you:
With the help of the above diagrams, you can make the connections with ease. Just ensure you get the color codes right. Use the 4-channel amp wiring diagram that offers the connection type of your stereo and amp support.
Connect the Remote Wire
Once you have hooked your amp to the stereo, remember to connect the remote turn-on wire. The remote wire is a small wire used to hook the amp to the accessory position such that the amp will switch on and off with the ignition switch. That way, the amp will not run while the engine is switched off, or else you will risk draining your car battery.
To connect the amp remote wire, check for the 12 volts wire that has power once the ignition is set to ACC. Essentially, the ACC wire is red in color. When you connect it this way, the amp will turn on when the key goes to the ACC position and turn off when you switch off the engine.
Conclusion
It is important to connect your 4-channel amp to your car stereo and speakers correctly. If you get the connections wrong, you risk damaging your amp, and stereo, or blowing the speakers. We hope the aforementioned 4 channel amp wiring diagrams will help you get the connections right. That way, you will enjoy improved sound quality without risking any of your car music equipment to damage.
Michael Evanchuk is a San Francisco-based sound engineer with 20 years’ experience installing, troubleshooting, and repairing commercial, automotive, and household sound equipment. Evanchuk owns an auto stereo center, where he offers highly competitive car audio installation and repair services. He has written dozens of articles on different sound engineering topics, all of which have been published in leading journals, blogs, and websites.


